

Image-to-image AI transforms an uploaded photo into a new image you control. The workflow is four steps: upload a source image, describe the change you want in a prompt, tune a few settings, then generate and download. That's it. You don't need a GPU, a local install, or a design degree.
Quick 4-step start:
- Upload a source image (PNG, JPG, or WebP, ideally 512×512 or larger)
- Prompt the change: "oil painting portrait, warm candlelight, keep facial features"
- Set strength to ~50% for a visible restyle that preserves composition
- Generate and download — most browser tools return results in seconds
Pro Tip: Copy this prompt to try right now: "product photo on white background, studio lighting, photorealistic, sharp edges, keep product shape." It works on almost any object photo.
Open Picturaai's studio to run that prompt on your own image for free during the beta.
Key Takeaways
Image-to-image AI gives you production-ready results in four steps when you pair a specific prompt with the right strength setting.
| Point | Details |
|---|---|
| Start with a clean source image | Crop tightly and use 512×512 minimum; better input means better output. |
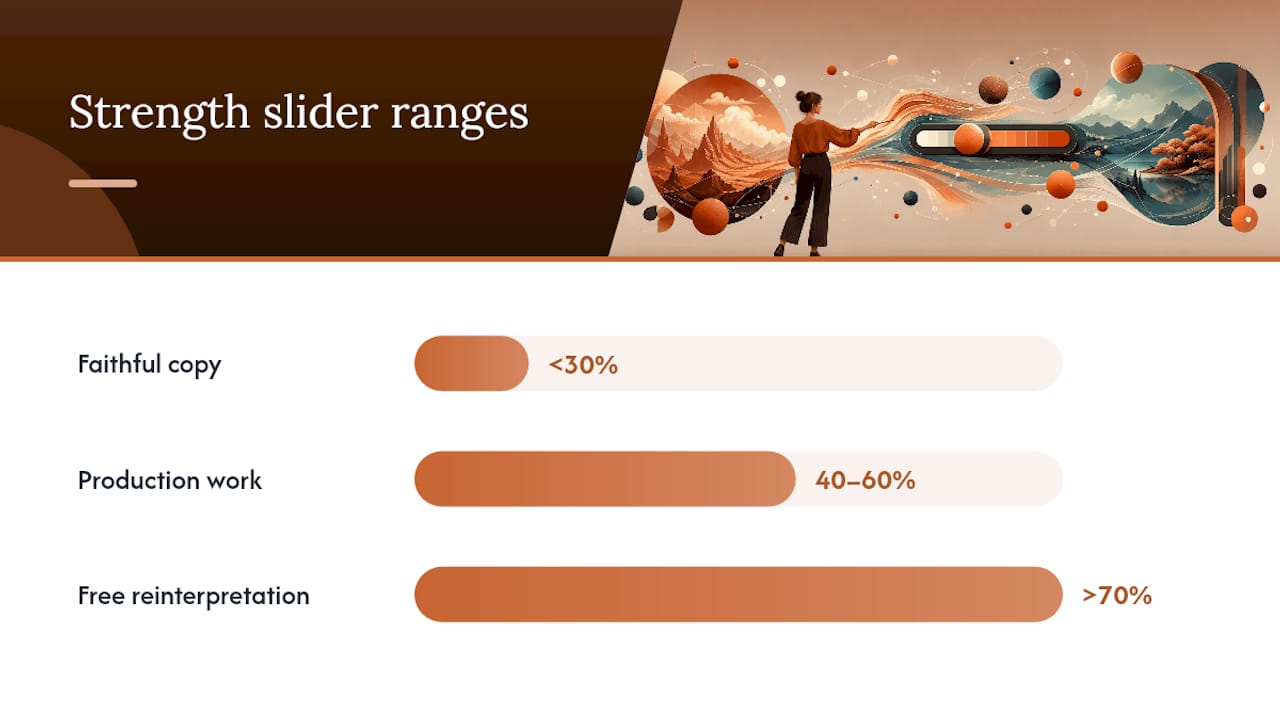
| Strength controls fidelity | Keep strength under 30% for subtle edits; use 40–60% for visible restyles that preserve composition. |
| Negative prompts prevent artifacts | List what to avoid ("blurry, distorted hands, watermark") to get cleaner professional outputs. |
| Check terms before commercial use | Ownership and commercial rights vary by tool and tier; read the provider's terms first. |
| Picturaai offers free beta access | The pi-1.5-turbo model with multi-stage diffusion, inline inpainting, and 4K output — free during beta. |
Table of Contents
- How does image-to-image AI differ from text-to-image?
- Step-by-step: how to run an image-to-image job in the browser
- What image-to-image features will you actually use?
- How to write prompts that actually control what changes
- Privacy, copyright, and output ownership for U.S. creators
- How Pictura AI handles image-to-image — and how to get started
- What do browser-based image-to-image jobs cost and how long do they take?
- What hardware and browser do you need to run image-to-image AI?
- When should you use image-to-image AI vs. hire a designer?
- Picturaai: free image-to-image AI built for creatives and marketers
- Sources
How does image-to-image AI differ from text-to-image?
Text-to-image starts from nothing. You write a prompt and the model invents the entire scene from scratch. Image-to-image AI starts from your photo. The model uses that visual reference to anchor composition, color, and subject identity, then applies the changes your prompt describes. The output is guided by both the image and the text simultaneously.
That distinction matters in practice. Text-to-image is great for generating original concepts when you have no reference. Image-to-image is the right call when you need to preserve something specific: a product's shape, a person's face, a brand's color palette. Trying to recreate those details from a text prompt alone is slow and inconsistent.
| Dimension | Text-to-image | Image-to-image |
|---|---|---|
| Starting point | Text prompt only | Uploaded image + prompt |
| Subject identity | Invented by the model | Anchored to source image |
| Composition control | Low (prompt-dependent) | High (source guides layout) |
| Best for | Original concepts, mood boards | Restyles, edits, brand consistency |
| Typical use cases | Campaign concepts, illustrations | Product retouching, style transfer |
Pro Tip: When identity preservation matters (a face, a logo, a product), always start with image-to-image. Text-to-image will hallucinate details that don't match your source, no matter how specific the prompt.
Step-by-step: how to run an image-to-image job in the browser
The full sequence takes under two minutes for a single image at standard resolution.
- Prepare your source image. Crop tightly to the subject. Remove distracting backgrounds if possible. Save as PNG or JPG at 512×512 minimum; 1024×1024 gives the model more detail to work with.
- Upload. Drag the file into the upload zone or click to browse. Most browser tools accept PNG, JPG, and WebP. Check the file-size limit (commonly 5–10 MB).
- Write your prompt. Lead with the subject, then style, then lighting, then mood, then what to keep. Example: "vintage travel poster, bold flat colors, warm sunset, keep mountain silhouette."
- Set strength. Low strength (under 30%) makes subtle edits. Around 50% produces a visible restyle while preserving composition. Above 70%, the model reinterprets the image freely.
- Set guidance scale (CFG). Higher values (7–12) push the model to follow your prompt more literally. Lower values (3–6) give it more creative latitude.
- Choose aspect ratio and seed. Match the aspect ratio to your output destination. Lock a seed number to reproduce a result exactly.
- Mask or inpaint (optional). Paint over the area you want to change. The model edits only that region and leaves the rest untouched.
- Generate. Click run. Standard-resolution single images typically return in seconds.
- Iterate. Adjust strength or prompt wording if the result drifts too far from the source. Download when satisfied.
Key settings at a glance:
| Setting | What it controls | Practical range |
|---|---|---|
| Strength / amount | How much the model departs from the source | 20–70% |
| Guidance scale (CFG) | How strictly the model follows the prompt | 3–12 |
| Aspect ratio | Output dimensions | Match your platform |
| Seed | Reproducibility of the result | Any integer; lock to repeat |
| Inpainting / mask | Region-specific editing | Paint the area to change |
Common errors and quick fixes:
- Too blurry: Raise resolution or lower strength slightly; blurriness often means the model is averaging between source and prompt.
- Identity loss (face or product unrecognizable): Drop strength below 40% and add the subject's key features to the prompt as "keep" instructions.
- Artifacting or distorted hands: Add "no distorted hands, no artifacts, sharp details" to your negative prompt.
- Slow generation: High-res and batch jobs take longer. Drop to standard resolution for fast iteration, then upscale the winner.
What image-to-image features will you actually use?
Browser-based tools have converged on a core set of features. Knowing what each one does saves you from hunting through menus mid-project.
- Inpainting / mask: Paint over a region and prompt only that area. Use it to swap a background, remove an object, or fix a flaw without touching the rest of the image. Browser-based tools running open-source diffusion models like SDXL support inline inpainting with free daily usage tiers.
- Multi-reference fusion: Feed several source images at once to keep a consistent subject across multiple outputs. Image2image supports up to 9 reference images and exports up to 4K, which is useful for designers building a character across frames or marketers maintaining brand consistency across a campaign.
- Background replacement: Swap the background while keeping the foreground subject intact. Gemini's image-editing features include background replacement and multi-image fusion, with model modes that trade speed for quality.
- Style transfer / restyle: Apply a visual style (oil painting, flat illustration, cinematic film) to the source image. The composition stays; the aesthetic changes.
- Upscaler / restoration: Increase resolution or repair compression artifacts on an existing image. Useful for bringing older assets up to 4K for print or large-format display.
- Canvas extension: Expand the image beyond its original borders, letting the model fill in the new space consistently with the existing scene.
Browser and file-format notes: Most tools accept PNG, JPG, and WebP. Maximum file sizes typically run 5–10 MB. Very large source images may be auto-downsampled before processing, so check the tool's stated input limits before uploading a 20 MB RAW export.
How to write prompts that actually control what changes
The single most reliable prompt structure is: subject + style + lighting + mood + what to keep. Vague prompts produce vague results. Specific ones converge faster.
Prompt patterns for common jobs:
- Restyle: "watercolor illustration, soft pastel palette, diffused natural light, keep product shape and label text"
- Background swap: "white studio background, clean gradient, no shadows, keep subject in foreground"
- Object removal: "remove the bench, fill with grass and trees, match surrounding lighting"
- Canvas extension: "extend the sky upward, match existing clouds and blue tone, seamless blend"
Negative prompts tell the model what to avoid. They're as important as the positive prompt for professional work. Short, specific lists work better than long rambling ones.
- "blurry, low resolution, distorted hands, watermark, text artifacts, overexposed"
- "extra limbs, duplicate objects, mismatched lighting, noise"
The strength slider is your editorial control. Think of it as a dial between "faithful copy" and "free interpretation." Keep it under 30% when you need the source to dominate. Push past 70% only when you want the model to reinterpret freely. Most production work lives in the 40–60% range, where you get a clear visual change without losing the subject's identity.
Pro Tip: Describe what should stay as explicitly as what should change. "Keep the logo legible, keep the product silhouette" gives the model a constraint to optimize around, not just a direction to drift toward.
Privacy, copyright, and output ownership for U.S. creators
Ownership of AI-generated images in the U.S. is unsettled. The U.S. Copyright Office has declined to register works created solely by AI, but human-directed outputs with sufficient creative input may qualify. Before any commercial use, read the specific tool's terms of service.
Practical safeguards:
- Strip EXIF data from source images before uploading. Many tools store or log uploaded files; metadata can expose location, device, or client information.
- Avoid uploading third-party copyrighted material. Using a copyrighted photo as a source image for AI transformation does not automatically clear the copyright on the underlying work.
- Check commercial-use terms. Some free tiers restrict commercial use or require attribution. Free notes commercial-friendly licensing, but terms vary by model and tier.
- Use a privacy-focused tool when working with client assets or sensitive imagery.
Reputable browser tools include content moderation layers that block outputs violating safety policies (explicit content, deepfakes, trademarked logos used deceptively). These filters run automatically and are not optional. Expect occasional false positives on stylized or abstract prompts.
How Pictura AI handles image-to-image — and how to get started
Picturaai's features are built around its pi-1.5-turbo model and a multi-stage diffusion pipeline that prioritizes output fidelity over speed shortcuts. For creatives and marketers who need production-ready results without a local GPU, that architecture makes a practical difference.
What you get:
- Multi-stage diffusion for high-fidelity outputs
- Inline inpainting and mask editing directly in the browser
- Multi-reference fusion to maintain subject consistency across frames
- 4K output support for print and large-format work
- Privacy-forward policies with no forced account creation during beta
- A developer REST API and SDKs for teams building at scale
Getting started takes three steps: open the Picturaai studio, upload a source image, and run the sample prompt from the top of this guide. The beta is free with unlimited access. For heavier API usage, check the pricing page for plan options.
It costs one generation and saves several.*
What do browser-based image-to-image jobs cost and how long do they take?
Most single-image jobs at standard resolution return results in roughly 5–15 seconds in a browser tool. Higher resolutions, upscaling passes, and batch jobs push that to 30–90 seconds or longer depending on the platform's queue load.
Common pricing structures:
- Free tier: Daily token or credit limits, standard resolution, watermarked or limited exports. Good for exploration and prototyping.
- Pay-as-you-go credits: Buy a pack, spend per generation. Costs vary by model quality and resolution. Higher-quality or pro models consume more credits per run.
- Monthly API subscription: Fixed monthly fee for a credit volume, with overage rates. Suited to marketing teams running batch campaigns or developers integrating generation into a product.
Where cost spikes appear: 4K upscaling, large batch jobs, and pro-model inference all consume significantly more credits than a standard single-image run. Plan your workflow to iterate at standard resolution, then upscale only the final approved output.
Picturaai's beta currently offers unlimited free access. For API-scale usage, the pricing page outlines plan shapes.
What hardware and browser do you need to run image-to-image AI?
Browser-based tools do all the heavy computation on the server side, so your local hardware barely matters. A mid-range laptop from the last five years handles the interface without issue.
What actually affects your experience:
- Internet connection: A stable broadband connection (10 Mbps or faster) keeps upload and download times short. Slow uploads on large source files are the most common friction point.
- Browser: Chrome and Firefox handle most tools reliably. Safari works but occasionally has WebGL or file-upload quirks with certain editors. Keep your browser updated.
- RAM: 8 GB is sufficient for the browser UI. You're not running the model locally.
- Mobile: Many tools offer mobile apps on iOS and Android for quick edits and social-ready outputs. Chrome extensions also expose fast image-editing shortcuts directly from the toolbar.
The one hardware consideration worth noting: if you're uploading large source files (over 5 MB), a faster processor speeds up the local file-handling step before the upload begins. It won't change generation time, but it removes a small friction point in high-volume workflows.
When should you use image-to-image AI vs. hire a designer?
Use image-to-image for fast iterations, on-brand restyles, and scalable campaign variations. Hire a designer for bespoke layout, complex compositing, or brand strategy work that requires judgment a model can't replicate.
The practical rule: if the job is "make this look like X style" or "swap this background across 40 product photos," image-to-image wins on speed and cost. If the job is "design a new brand identity" or "composite a multi-layer scene with precise type hierarchy," a designer wins on quality and intent.
A concrete example: restying 30 product photos for a seasonal campaign takes a few hours with a well-tuned img2img workflow. Briefing, revising, and approving the same job with a freelance designer takes days and costs multiples more. The tradeoff flips when the creative brief requires original thinking, not variation.
The best workflows combine both. Use AI to generate a range of directions quickly, then bring a designer in to refine the strongest one. That cuts the designer's time on exploration and focuses their hours on the work that actually requires human judgment.
Picturaai: free image-to-image AI built for creatives and marketers
Most browser-based image-to-image tools make you choose between free access and production-quality output. Picturaai skips that tradeoff. During the beta, you get unlimited free generations powered by the pi-1.5-turbo model and multi-stage diffusion — the same architecture that delivers 4K output and inline inpainting, not a stripped-down preview tier.
For marketing teams, that means running a full campaign restyle across dozens of product images without burning through a credit budget. For individual creatives, it means iterating freely until the output is right. The developer API and SDKs are available for teams that need to integrate generation into a product or automate batch workflows. Check the pricing page when you're ready to scale beyond the free tier. To start now, open the Picturaai studio, upload your first image, and run a prompt.
Sources
- Free
- Image to Image – AI Image-to-Image Editor & Photo Editor
- Nano Banana 2 - Gemini AI image generator & photo editor